Thursday, August 30, 2012

LESSON 5


Lesson  5:  Card Making

      Study the picture sets below. Notice the same steps were taken in each set of pictures.
     Though I've used pictures that look like real things in this lesson, you don't have to make anything look real in expressive art. You can make everything abstract--and as long as it's done neatly--it will be great. Remember not to be in a hurry. Your goal is to enjoy your Profusion Art time.


     You can do Profusion Art on any kind of card, but these cards have been simplified to         make the most of adding color. In this case it’s water color.
1.        First, make a simple line drawing
2.      Next, watercolor the line drawing
3.      Then, draw details in black pen, just as you have learned to do in Profusion Art

ASSIGNMENT:  Using the next twelve patterns, mix and match to make a never-ending supply of cards. You’ll have fun making the cards, and they’ll show an extra measure of love for those who receive them, so everyone is enriched.


( If you don’t know, or have forgotten what the TnT line technique is, go back to Lesson 1. )


In this lesson, I’d also like you to consider how you could dress up names or words to put on a card or another project.  Notice the word art illustration below—and have fun with your patterns, or make up new ones!

Word Art

Monday, August 13, 2012

LESSON 4


Lesson  4:  Project Clean

If you found the last lesson too elementary, this lesson takes a step in a new direction. You will be adding pictures of real objects. They are stylized or simplified, but it is easy to tell what they are. The rest of the squares are abstract and can be used as eye-carriers or filler. 
To see an example of how I’ve used these patterns in “Clean,” go back to the Tuesday, July 31st posting.

Tip:  Use a variety of light, medium, and dark values to create a more interesting design.

Below are six squares with seven patterns.


Pattern instructions follow for each square: (Sponges and Water Globs are shown as separate squares)


Assignment:  Use these seven patterns, plus any other patterns you wish, to create a new work of art.


"Clean" by Marie Scott  (This picture was made using the seven previous patterns, plus some basic patterns.)


Saturday, August 4, 2012

LESSON 3


Lesson  3:  Crazy Quilt

This illustrates how you can "draw" your own quilt using nearly any pattern

          This is an exciting lesson because you will do your first project using "Profusion Art" patterns—plus anything else you want to add to it. Again, be neat and take your time because, as promised, there are 12 quilt patterns to draw onto 4”X4” cards, as well as your crazy quilt to design and draw. This is a simple lesson, though it will consume time. (Time—like the 15 minutes here and there that may otherwise be wasted.)  Don’t forget how portable this art is.

Tip:   You can work on one square at a time while doing the following:
1.       Waiting at the dentist or doctor’s office
2.       Waiting for a child at an appointment
3.       While watching TV
4.       While resting
5.       Any time you have a wait of any kind on your hands

       
Here are the 12 quilt block patterns below arranged in two triangles per square.  You may also do it that way if you wish.


Here are the instructions for those patterns below.


       Assignment:  After you have drawn your 12 patterns on 4”X4” cards, make a plan for your crazy quilt, choose the patterns you’ll use in it, and draw it up! Have the time of your life.   (For an example of how to do this project, refer to the July (7) previous post  [not the sidebar]  called "How is it done?"   It gives you a picture diagram on how to create the plan and make the quilt.) 


LESSON 2


Lesson  2:  Basic Patterns
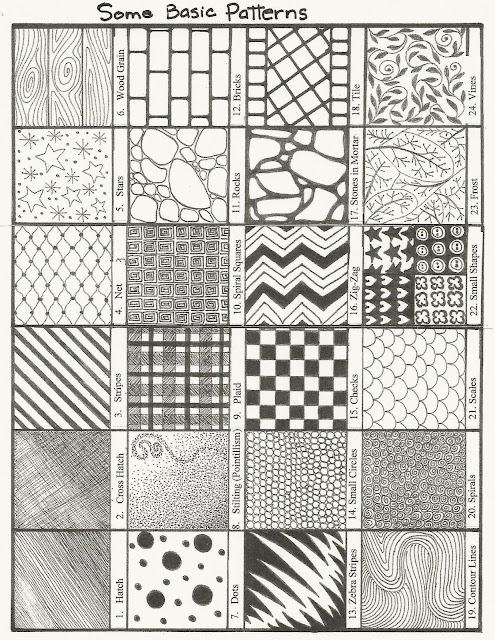
As promised, I have 24 basic patterns in this lesson, some of which you may use repeatedly, as I do. Some are art techniques, such as hatching and cross hatching, and others are patterns. You may have ideas for many other basic patterns. If so, draw them onto your cards for later reference.


(Instructions for these patterns follow below)


Assignment:  Draw each pattern onto a 4”X4” card to keep in your portfolio for future use. You may have ideas for many other basic patterns. If so, draw them onto your cards for later reference. Be neat and take as much time as you need for this lesson, as you are laying the groundwork for great projects ahead.


LESSON 1


Lesson 1 : Thick and Thin Line Technique (TnT)
            Whenever you do a line drawing, it can be enhanced by using the thick and thin line technique. (TnT) I use this technique so much that it has become second nature to me and I barely think about it. I learned it from an Iowa high school art teacher—bless her heart. And though I studied art intensively in college, no mention of the technique was ever made by any other teacher I had, nor book I studied.
             This technique can make nearly any drawing—even clumsy and bad—look like real artwork! 
            As you see in the drawings below, you simply make some areas of a line or outline thicker than others.
            Areas for possible thickening are:
1.     Corners
2.     Rounded loops
3.     Ends
4.     Curves
5.     Anywhere you decide

 In the picture below, the left side of the page shows the lines drawings without enhancement.  The right side of the page shows the same drawings enhanced with areas of thickened lines.


If you can see, I've got small excerpts of examples where I've thickened different lines than in the larger drawings.  It really does change the appearance of the artwork.

The last example on the page is for you to experiment with.

Assignment:  See how you can change the appearance of the lines in the last example by thickening them in some places.


So, finally, we begin with the lessons!
            Initially, In Lessons 2 and 3, I will post a set of 24 basic patterns, and then a quilt project with 12 patterns.  After that, I am going to post a new “themed” lesson on this blog each month, with at least four patterns to go with it. It is best if you learn to draw each pattern first, on a 4” X 4” card.   Then you will be practiced enough to use the pattern in your art.
 
There will be four types of patterns:
1.     Fillers—small background art
2.     Objects—stylized pictures of real objects or things
3.     Eye-carriers—long or moving shapes that carry the eye (rope, ribblon, etc.)
4.     Abstracts—abstract art

If you are just learning, you may copy and trace my designs. You are always allowed to use or trace my designs if you credit me as your source.  You may call your art creations “Profusion Art Adaptations.”

Copying and tracing are good methods of learning how to do art, though you can’t take credit for being the “artist.” Eventually you’ll get practiced enough to create your own designs.

Once I have my 4”X4” cards drawn, I use them again and again in any piece of work I want. Sometimes I even trace in time-consuming backgrounds—having already done the work once. I can move my card under my drawing as I need to for filling in areas of space.

Whenever I can, I draw from real life. Real life offers an artist many more options than drawing from a picture or from memory. It’s interesting to note that different artists see different things in a real person, animal, plant, or scene.  Notice, in the picture below, what drawing I got as I drew from real sagebrush.


Sagebrush and my drawing


Now on to Lesson 1!